In a journey of 45min, we will see how this solution provides relevant answers to the major concerns any High-Tech SMB company may face along their product development lifecycle.
BEAMY is a smart mobile speaker with image projection capabilities. This device has been on the market for some time.
A request for product improvement comes from the marketing department because BEAMY owners use it more “off-dock” than expected, experiencing unpleasant battery power outages after three hours of projection time. The Product Team has a plan to satisfy consumers’ expectations:
Minimize energy consumption: Change LED-based projection module for a laser LED one which is much more efficient: 30% brighter, while providing 15% energy savings
Increase battery capacity: Replace batteries for 20% larger ones, providing +25% device autonomy
Demo synopsis

Dassault software apps used:
CATIA 3DEXPERIENCE R2020x FD01
SOLIDWORKS 2019
CATIA V5-6R2020 SP1
XCADDesignConnectors 2020x FD01
PLM Collaboration Services for CATIA V5
PLM Collaboration Services for SolidWorks
PLM Collaboration Services for Altium Designer
ALTIUM Designer 20.0.1
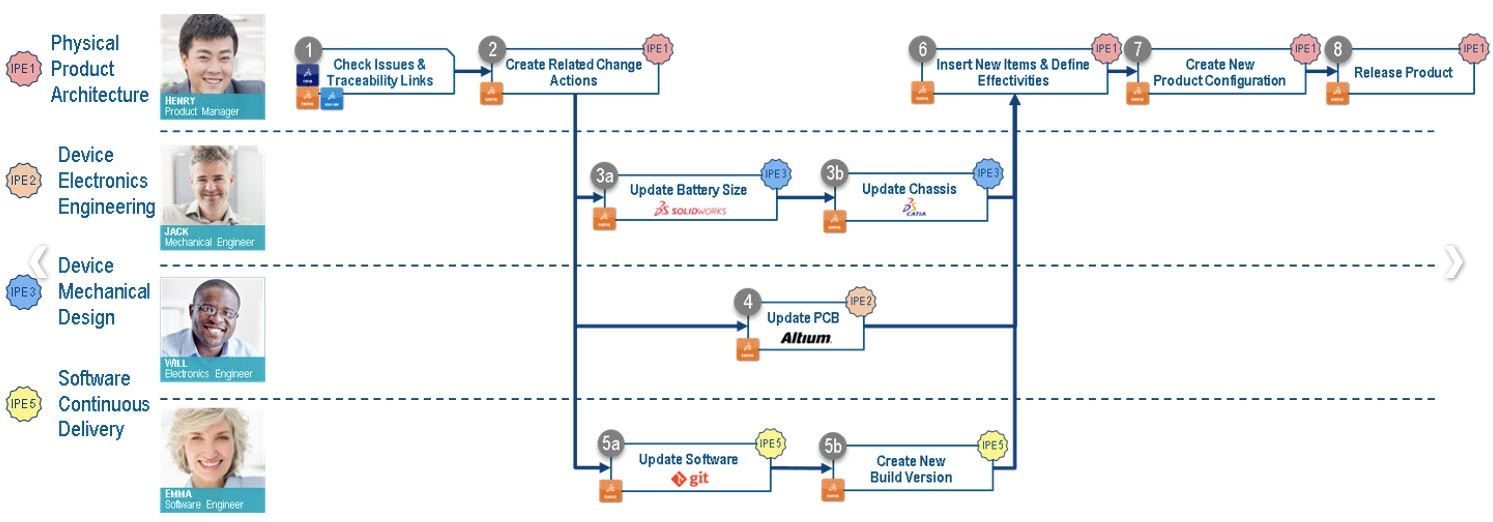
Step 1: Check Issues & Traceability Links
Henry, the Product Manager, checks the list of Issues reported against the previous version of the Beamy2 using the Issue Intelligence widget: he notices there is many issues about the autonomy lately.
Thanks to full product traceability, he can quickly identify from the requirement the impacted components:
Battery (Mechanical): A larger battery is needed
Chassis (Mechanical): The frame has to be adapted for the new battery
BeamyPCB (Electronics): The PCB design has to be updated for power consumption optimization
BeamyBuild (Software): The Software Build has to be updated to take into account an Eco Mode functionality
He is now ready to initiate the change management process to solve the autonomy issue on the new version.
Step 2: Create Related Change Actions (since is based on existing product)
Henry creates a new model version of the Beamy2. Based on this context and directly from the 3DDashboard, he is able to:
Create change actions using the Change Action widget to ask his Team for products enhancement (battery, chassis).
Select assignees & reviewers for both change actions
Define required changes & contexts for both change actions
Create dependencies between the two change actions
Henry also creates two tasks to ask Will & Emma for PCB & Software enhancement.
Step 3a: Update Battery Size
Jack opens the battery from the 3DEXPERIENCE platform using the SOLIDWORKS Connector.
Directly within SOLIDWORKS, Jack can:
Work under change
Check in modifications
Freeze the design
etc.
Within SOLIDWORKS, Jack works under change to record the modifications applied to the battery.
After saving the design to the 3DEXPERIENCE platform, he promotes the change action into the “Implementation Review” state to ask for Henry’s approval.
Step 3b: Update Chassis
Following previous change on the battery, Jack opens the Frame from the 3DEXPERIENCE platform in CATIA V5.
Directly within CATIA V5, Jack can:
Work under change
Check in modifications
Freeze the design
etc.
He works under change in CATIA V5 to record the modifications applied to the chassis.
After saving the design to the 3DEXPERIENCE platform, he promotes the change action into the “Implementation Review” state to ask for Henry’s approval.
Step 4: Update PCB
Will checks the tasks assigned to him in the Collaborative Tasks widget and opens the PCB Altium project from the 3DEXPERIENCE platform.
He modifies the schematics by picking and placing new components from the 3DEXPERIENCE platform. Then, he imports the change in the Layout from the schematics & places the component footprint.
Will saves the changes applied to the PCB to the 3DEXPERIENCE platform and closes the task.
Step 5a & 5b: Update Software & Create New Build Version
Emma reads and comments the Task sent by Henry using the Collaborative Tasks widget.
Emma updates the software code to take into account a new Eco Mode function. After the update, she saves the modification in GIT.
Then, Emma links the new Software Build revision with the new version in GIT, and closes the task.
Step 6: Insert New Items & Define Effectivities
Henry creates a new Eco Mode Variant and inserts it into the new revision of the Beamy2 model version using the Model Definition widget.
Then, Henry works under Evolution in the Engineering Release widget to update the Beamy2 Engineering Structure.
Finally, he defines variant effectivities for the new Engineering Items.
Step 7: Create New Product Configuration
Henry creates a new product configuration called “Pro Edition with Eco Mode” using the Model Definition widget and defines a matrix rules associated to new variant values.
Henry verifies the new product configuration by filtering the Engineering Structure in the Engineering Release widget.
Step 8: Release Product
Finally, Henry reviews & validates the two change actions to release the associated engineering items.
To put an end to the modification process, Henry promotes the latest model version of the Beamy2 into the “Release” state.
Step 9: Prototype machining
best in class toolpaths & maximum control
fixture design
tool management & online catalog integration
toolpath simulation with crash collision detection
G-code generation
Step 10: New Product design ideation
imagine & shape catia modules to be added
Alternativno enterprise organizaciji rada - agilni pristup kolaboraciji
Quick'n'easy način rada gde je viši fokus na inovaciji a manji na administraciji
Što se tiče podataka u osnovi direktna integracija postoji u aplikacijama SolidWorks CAD i CAM, Catia CAD i CAM, MS Office dok za ostale softvere postoje konektori. za sve ostale tipove integracija je podržana na nivou fajl extenzije(ne direktno u "authoring" aplikaciji).
Accelerated Device: Beamy Mechatronics (3DEXPERIENCE R2020x)